Setup, Installation & Removal
What is the easiest way to install and remove my boat lift?
If shallower water and level shore line, raise sand pads all the way up and wheel out. In deeper water, use a Float N Roll.
What is the best way to store my lift?
Store on level ground away from any potential ice movement. If leaving batteries on lift, be sure they are fully charged. Wireless, motor and other accessories can stay on the lift over the winter. If leaving your batteries on the lift, disconnect your wireless remote from the ASC as it has a continuous draw on the batteries.
What's the difference between pontoon cradle pads and pontoon full length bunks?
Cradle pads are short bunks that hold the pontoons. Pontoon bunks are full length and lift the pontoon from the underside. Cradle pad pontoon bunks work in shallower water.
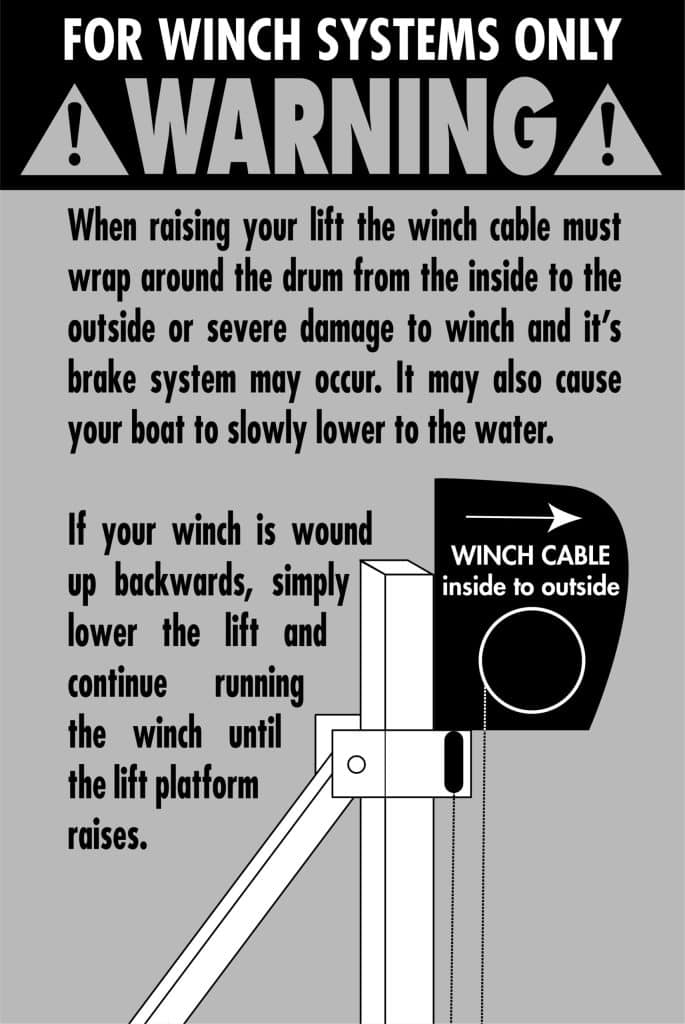
Which way does the cable go on a DC winch?
The winch drum must always rotate from the inside to the outside when raising the boat. When wound correctly, the cable will go up the back of the winch, or the side closest to the corner post.
What water depth is needed for FLOE lifts?
Approx.6.5’ without leg extensions and 8’ with leg extensions this may vary depending on the hull and wave conditions. The optimum water depth for most lifts is 26” – 66”.
The motor will not reach the screw drive?
The bolts were not placed through thrust bearing when assembling the lift. Refer to your boat lift assembly instructions.
Canopies
What size canopy should I purchase for my lift?
The general rule is to add a minimum of 2’ to the total length of your boat. If the motor extends off the back, include that in the length.
What are the specs on the canopy fabric material?
The fabric is a 1200 Denier solution-dyed polyester. Total weight per linear yard is approximately 11 oz. including all coatings
How can I tell what size canopy I have?
To determine the width, simply measure from outside the frame to outside the frame. FLOE offers canopies that are 8’, 9’ 10’, 10.5’ and 11.5’ wide. To determine the length, count the spaces between the hoops which are 2’. If you have 10 spaces, it’s a 20’ canopy.
Can the SDP fabric be waterproofed?
FLOE Canopies have a water resistant coating applied to them. After a thorough cleaning you may want to re-apply a water resistant repellent. Suggested product to use is 303 Products.
How can I tell what size canopy I have?
To determine the width, simply measure from outside the frame to outside the frame. FLOE offers canopies that are 8’, 9’ 10’, 10.5’ and 11.5’ wide. To determine the length, count the spaces between the hoops which are 2’. If you have 10 spaces, it’s a 20’ canopy.
What is the weight of SDP canopy fabric?
This will vary depending on size. A 26’ canopy fabric weighs approximately 33 pounds
How do I protect the canopy and lift during a storm?
Never leave the fabric on the lift if there is no boat in place, especially during a storm. In high wind areas, consider using mesh ends and/or auger posts secured to the lift. If you are going away for extended period with your boat, always remove the fabric.
What is the purpose of a canopy extension?
Extensions are for wake tower boats, pontoons with bimini types of covers or any watercraft that that exceeds the average boat height. If the customer feels the sides of the boats are exposed when the craft is lifted to the maximum height the canopy extensions offers the customer an additional 18” of side coverage.
How can I tell what size canopy I have?
To determine the width, simply measure from outside the frame to outside the frame. FLOE offers canopies that are 8’, 9’ 10’, 10.5’ and 11.5’ wide. To determine the length, count the spaces between the hoops which are 2’. If you have 10 spaces, it’s a 20’ canopy.
How do I determine the proper height of a canopy?
Position canopy up as high as possible. Place boat in lift and raise the lift to the highest position. Next, lower the canopy so the highest point of boat is 1” below canopy. Adjust canopy before fabric is installed. See video on website “Proper Boat Lift Setup”
What is the canopy railer adjuster?
This adjuster extends and retracts the frame a few inches allowing the fabric to fit properly for a tailored fit. The side rails and center rail all extend.
Why is my canopy leaking?
FLOE SDP fabrics will provide excellent protection to your boat from harmful sun exposure. The combination of heat-sealed seams and the water repellent fabric will minimize rain entering the boat. Heavy and/or persistent rain will increase the likelihood that water could pass through the fabric. This can most likely occur where the fabric makes contact with the canopy support frame. It is recommended the canopy be kept taut using our exclusive Quick-Clip and Horizontal Fabric Tension System. A taut canopy promotes the best run-off and will minimize water penetration.
How do I clean canopy fabric?
See instructions in owner’s manual– To thoroughly clean SDP fabric follow these simple steps: First, brush off loose dirt and hose down. Next, prepare a cleaning mixture of water and mild natural soap (no detergents). Now, use a soft bristle brush to clean. Allow soap to soak in and rinse thoroughly. Allow to air dry completely before storage.
What size uprights are included with a canopy extension kit?
Canopy extensions have 68” uprights. Standard canopies have 38” uprights for smaller lifts and 44” uprights on larger lifts.
What may cause the fabric to come off a canopy extension kit?
If the aluminum is wet or was not cleaned properly prior to the application of the adhesive Velcro, the Velcro may not stick and the fabric may come off.
General
How do I know if I have too much weight on my lift?
To determine the size of lift to use for a boat, use FLOE’s boat lift selector on the website. Also review information at the beginning of the owner’s manual.
Can I get longer legs for my lift?
Small lifts (V-2000 through VSD5000) have 30″ of vertical travel with the standard screw jack leg. An extension leg is available that will add an additional 20″ of height to the lift leg. In the event more height is needed, our double-braced Deep Water Legs are available (part number 511-60065-00). These legs add 48″ of height and are ideal in water depths of 74″-114″. We also suggest using two (2) pair of deep water braces per lift (part number 512-00052-00) with the Deep Water legs.
Large lifts (VSD6000 through VSD10,000) have 36″ of vertical travel with the standard screw jack leg. An extension leg is available that will add an additional 13″ of height to the lift leg. In the event more height is needed, our double-braced Deep Water Legs are available (part number 511-60060-00). These legs add 48″ of height and are ideal in water depths of 74″-114″. We also suggest using two (2) pair of deep water braces per lift (part number 512-00053-00)
How can I replace the vinyl on the full length bunks?
Remove rivets. Slide vinyl out, slide new vinyl in, replace rivets.
How can I identify what model lift I have?
V-lift has V braces on both sides of lift and 1 battery, VSD has the ball screw tube. For exact size of lift, see sticker on corner post. If no sticker, use a caliper in the adjustment hole of the corner post. V2600 .090; V3600.124; V4600 .187; VSD 3800.125; VSD 5000 .188
What is the warranty on a new lift?
All new lifts are covered by a 100% parts and labor warranty for the first two years. After that initial period, different components have different coverage 15 Year warranty on the aluminum structure (10 years/100% parts then 5 years of pro-rated coverage after that) 10 Year warranty on accessories and components like bunks/guides/canopy frames (2 years/100% parts then 8 years of pro-rated coverage after that) 5 Year warranty on accessories and components like canopy fabrics (excludes fading), winches, cables, leveling legs, VSD drivetrain, VSD ballscrew, wheel kits, wireless remotes, corded remotes, limit switches and solar panels (2 years 100% parts then 3 years pro-rated coverage after that) please contact your local dealer for specific warranty questions. Warranty coverage is only offered to the original purchaser of the lift. Warranty starts with in-service date
The motor will not reach the screw drive?
FLOE lifts hold their value and are hard to find on used for sale listings. Value depends on the shape of the lift and the age. Dealers can give you a fair trade value.
The motor will not reach the screw drive?
Not suggested- To make a lift wider you would need to change out the front/rear cradles and frame beams as well as the cables.
How often should I grease my boat lift?
Grease the lift legs and ball screw tube/thrust bearing on VSD lifts annually per the labels on the lift and owner’s manual.
How To Video links:
How do I adjust the height of my lift?
Using a cordless drill or ratchet with a 3/4″ socket will allow you to easily raise or lower your lift frame. The tape measure on the leg is not actually measuring water depth. If the water level is at the same number on all legs, your boat lift is totally level.
How much does my lift weigh?
Electronics
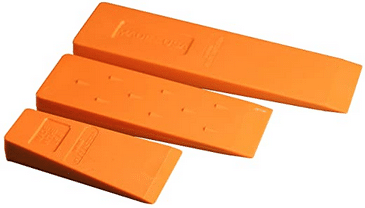
Why won't the motor come off the VSD lift?
During the assembly process, a coating of anti-seize material should have been applied to the motor shaft and coupler to prevent them from rusting together. In the event the motor needs to be removed for service, some common felling wedges can make the job easier. Tap 2-3 plastic felling wedges between the motor plate and the lift frame. Tap one, then move to the next in a circular pattern. This has proven to be an effective way to remove a motor without damage.
If the motor falls into the lake is it ruined?
Dry the motor out completely before testing if it works.
How often should I replace the batteries?
Batteries can last quite a few years if taken care of. In the off season, you can leave the batteries on the lift but they must be fully charged. If leaving them in an unheated area it is a good idea to keep a trickle charge on them. If you store batteries that are not charged in freezing conditions, your batteries can freeze and will need to be replaced.
Why does my battery keep dying?
If the battery wasn’t fully charged and was left outside in cold temperatures, it may have frozen and will no longer hold a charge. Ideally, batteries stored outside in frigid weather should be placed on a trickle or maintenance charger. Be sure the ports and terminals are cleaned before putting them in storage. Using a Solar Charger on your lift will ensure the battery remains charged during the summer months.
How many volts should my battery have to properly run the lift?
Each battery should have between 12.7 and 13.8 volts. Be sure battery connections are corrosion-free and tight.
Why does the lift go up and not down?
See diagnostic checklist in your owner’s manual to help trouble shoot any problems.
Click here for a diagnostic guide
What voltage is on the lights?
Flood light is a 12V light and works on both 12V and 24V lifts. It draws less than 1 amp and has 120 LEDs in each bulb. Automatic shut off after 15 minutes.
How many watts are each solar panel?
Prior to 2018 solar panels were 5 watts. 2018 models are 20 watts
How many amps does the wireless remote draw?
Less than 1/10th of an amp.
What does a limit switch do?
Limits the upward and downward travel on a lift. DC winches only have an upper limit switch. VSDs have both upper and lower. A lift will not work if the limit switch is not connected. In the tool kit on each lift, there is a limit switch bypass plug that plugs into the ASC. There is a glass reed potted in a plastic house for greater protection as part of the limit switch.
How can I adjust or move my limit switch?
If your boat has a wakeboard tower or other high accessories that require the lift to not go up as high, you can move the limit switch down. Be very careful when removing the tape so you don’t break the reed inside the enclosure.